


How To Move Your Blog From Blogger To WordPress
Step by Step Guide 2020
Blogger is a well-known and straightforward content management system. When a person decides to start a blog, the chances are that Blogger will be the first choice to go with among other free blog sites. There is nothing wrong or strange about that decision. The platform is owned & run by Google, it takes you just a few clicks to set up the basics, and don’t forget the fact that it is completely free. Although this guide will teach you how to transfer the entire thing to the self-hosted WordPress which we prefer, don’t feel bad about choosing Blogger for your early beginnings.
But if you have already open this guide, the chances are that you want to move away from Blogger. Maybe you want to get more serious about blogging, and the free platform simply is not good enough. Maybe you want more customization options or you simply found out that it’s hard to make money by running a blog on Blogger. Whatever reason you have, we welcome it. Yes, Blogger is a cute platform that’s perfect for complete beginners, but now that you have outgrown it, you should consider switching to WordPress. Why?
- Having a self-hosted WordPress site gets you in charge. You will own the site, domain, and the entire content. There are practically no limits, and you can get what you want from your blog
- WordPress counts tens of thousands of free & premium themes and plugins you can use
- Self-hosted WordPress site is completely customizable (when you release the curtains, you will get access to the entirely new world of backend)
- When you self-host with a renowned hosting company, you will have unlimited storage, bandwidth, and support
How To Move Your Blog From Blogger To WordPress

So, have you made your final decision to move the blog? No, don’t overthink that now! We welcome your decision – starting a self-hosted WordPress site was a smart choice and you will end up having more perks than you might have thought.
Since you have invested so much time into Blogger, it would be a shame to just forget about it. While there’s no point in transferring a couple of posts and images, the chances are that you have devoted months if not even years before realizing the benefits of WordPress. Don’t worry; if you stick with us, we will show you how to transfer your blog from Blogger to WordPress in no time.
What should & will be transferred?
Before we start, it would be nice to know a few details.
In a perfect world, you would go to one blog, click a button to export it, and it would magically appear on your self-hosted website. While it is still not possible, we at First Site Guide offer a substitution for the magic. Let us move your Blogger site to a self-hosted WordPress.
Unfortunately, it is not possible to transfer the entire site as it looks on Blogger. The style of your blog (theme, extensions, fonts, colors, widgets, etc.) will have to be added separately. You can only transfer the data:
- Posts & Pages
- Comments
- Categories
- Media
- Permalinks
- Feed
- Authors
- Traffic
Let’s start the transfer

Alright, we are all set to go. While it definitely takes some time to perform each step correctly, moving your blog from Blogger to WordPress is not that hard even if you’re a complete beginner. Do not rush and do not skip steps.
1. Choose the best WordPress hosting
Since you are moving to a self-hosted WordPress, the first step would be finding a WordPress hosting company that will take care of your files. You will need to install WordPress on that host, and you will have to trust the company. You are starting a serious blog now, so you should not take this for granted.
There are dozens of hosting companies that are providing WordPress hosting services. Also, there are hundreds (if not more) websites that compare them. But before you hit the search button on Google or other search engines of your choice to start reading all the reviews, we should warn you that many sites & reviews are paid for. So, you will end up reading fake reviews and bogus opinions on a hosting company that paid to get listed as the best one.
Step One – Get the deal
By following this link, you will get the same hosting deal at Netlight Systems for less money. Click “Order Now” button to proceed to the next step.
Step Two – Choose your pricing plan
Although the previous screen showed the most affordable plan, this deal allows you to select any of Netlight Systems plans with lower prices.
The Basic plan is limited to one website and 1GB of website space, but it still gets you everything you need to get started. But when you outgrow the Basic plan, it’s easy to upgrade, so that shouldn’t worry you at the moment.
Step Three – Domain Name
Netlight Systems gives you a free domain. Now it’s time to choose one for the blog. This is an important part, so don’t take it for granted. Once ready, carefully type in the domain name, and click “Next”.
2. Install WordPress
Congratulations! You have joined a family of millions of happy bloggers who trust their sites to Netlight Systems. You will soon realize it was a clever choice. Now that your account is ready, you can move on and install WordPress.
Did we mention that Netlight Systems loves WordPress users? Because of that, you get to install WordPress in just a few clicks of the mouse button:
- Log in to your Netlight Systems cPanel account
- Please go to the Website section
- Select Install WordPress
- Click the Install button
- Choose the domain name to install it to (in the field next to it, you can enter a subfolder such as ‘blog’ or leave it blank if you want the site’s main page to be the blog)
- Now click “advanced options” if you want to change the email address, username, and password for the new WordPress installation
- Read through the license and service agreements and check the boxes if you agree with everything (you have to agree in order to continue)
- Click the Install Now button
This is definitely the easiest way of installing WordPress. If you’re just trying to move the blog as soon as possible, we recommend that option.
3. Export your blog from Blogger
This is it. It is finally time to export the data from your (let’s call it old) blog that you have started on Blogger. You will need to take all the data from it and store into a file. Don’t worry; you won’t have to create files manually or copy the data. There is actually a button you will need to click and everything will be done in a jiffy:

- Log in to your Blogger account
- Go to Settings -> Other which will open the settings page
- On top of the page, find “Import & back up” section
- Find and click the “Back up Content” button
- A pop-up window will appear. Click “Save on your computer” button.
After clicking the button, Blogger will start downloading the XML file that contains all the important data from your blog. Depending on how much content you have, the file may be smaller or larger. You will end up having a file named blog with the date of export. For example: “blog-05-06-2019.xml”.
Locate the file (you can copy it to your desktop so you can find it more easily) and you are officially done with the export. This part wasn’t that scary, right?
4. Import the data to WordPress
If you haven’t skipped steps of this guide, you already have a hosting account and a WordPress site ready to be set up. Let’s import the data from Blogger to WordPress:

- Log in to your WordPress website
- Go to Tools -> Import
- Find Blogger on the list (it should be the first option, on top of the list)
- Click “Install now” link and wait for a few seconds for WordPress to finish installing the plugin
After the installation is complete, WordPress will show you a notification if the tool was installed successfully. The same notification will have the link to run the importer. Alternatively, you can click the link to Run Importer from the same spot where you found the install link.

- Click “Run Importer” link
- On the new page, click “Choose File” button
- Search for the XML file you downloaded in the previous step (desktop or any other folder where you left it)
- If necessary (depending on the size of the file, your internet connection speed, and your host) wait for a few seconds until the file loads
- Click on “Upload file and import” button when possible
Again, depending on the various aspects, this might take a few seconds, so please be patient. When the import is complete, WordPress will show you a new page where you will need to assign the author to the imported posts. Let us show you how to do that in the next step.
4.1. Help, the file is too big to upload!
Usually, WordPress puts a limitation on the maximum file size you can upload. The limit might differ, but you can always manually increase if it is necessary. If your exported file was simply too large, you will need to change the maximum upload size for WordPress. If you want to check your current upload limit, please go to Media -> Add New and find the information on the bottom of the screen.
Alright, let’s change that limit so you can import the blog without problems:
- Login to your Netlight Systems Control Panel
- Open the File Manager
- Chose to go to the Web Root and click Go
- Scroll in the right-hand panel and find file php.ini -> right-click it
- Select Code Edit in the pop-up menu
- Click Edit at the bottom of the pop-up
- Use the keyboard shortcut to open the find pop-up window
- Windows and Linux: Ctrl + f
- Mac: Command (⌘) + f
- Type upload_max_filesize in the search field and hit enter
- This will highlight upload_max_filesize = 50M. Change 50M to the size you need. For example 128M
- Open the find pop-up, again and in the Search text field type post_max_size and press enter
- Highlighted will be post_max_size = 50M. This will need to be changed to the same number as what was put in for upload_max_filesize
Click Save changes
4.2. Help, nothing happens!
Blogger importer is not a perfect tool. On most occasions, it works without a flaw. But every now and then (usually when dealing with larger blogs with hundreds of posts and thousands of images) it will simply refuse to do the transfer. You may not be able to export your Blogger blog properly, or the importer won’t run as it should.
If this happened to you, don’t panic. I found another solution to the problem. And to be honest, although it works a bit slower, it might be easier to handle for an average Blogger user.
- Open your newly installed WordPress site
- Go to Plugins -> Add New and search for “Blogger Importer Extended”
- Install and activate the plugin
- Go to Tools -> Import and find “pipdig WordPress Migrator”
- Click “Run Importer” blue link below the title
This plugin works a little bit different than the standard importer tool. Instead of manually exporting and importing files, the plugin will do everything automatically.
Because of the automation, you will need to connect the plugin to your Blogger account. So, click on the “Connect to Blogger” button, log in to your Blogger account. After this, you will be able to select your blog.

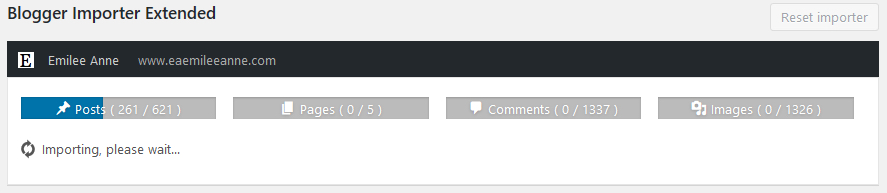
Once selected, the plugin will start working on its own and you will be able to see a few progress bars (see the image below). Those will let you know how many posts, pages, comments, and images you have to import. If you have a lot of posts and images, be prepared to wait for a few hours until everything gets done. Also, something I found out recently while doing a transfer with this plugin, it can’t always tell you the correct number of pictures you have. So be prepared to wait much longer because there may be hundreds and hundreds of images more than reported. That might sound like a bad thing, but the important part is that all of your images will get transferred. So, focus on that and be patient.
Please note that the plugin uses Google API to transfer everything. This service is free, but that also means it has daily limits. Still, even if you have thousands of images and posts, you should be able to do everything in several hours. The plugin will probably automatically keep connecting and disconnecting, but that shouldn’t worry you. Just leave the page open and come back in several hours when you will be able to confirm everything and have your Blogger blog successfully transferred to your new WordPress site.
After this, you can continue working your way through the migration process with the next step.
5. Assign an author
If you have had a lot of posts on your Blogger blog, it might be difficult to recognize them without changing authors. That’s especially true if you are importing the blog to a WordPress site that was already running. To help you with that, WordPress lets you reassign the author of the imported item to an existing user of the site.
WordPress will show a list of existing authors you can assign the content to.
If it’s a new site, you will probably have just one user that you created during the installation of the content management system. So, you can select the name for the list, and the content that you are importing will be automatically assigned to that user.

But if you would like to separate the content from the new one that you are going to add, later on, you can also create a new user directly from this page. In that case, you can write the name of a new user. Its user role will be set to subscriber and password will be randomly generated. You can change the user details later on.
After deciding whom to assign the content to, click the “Submit” button and you are all done.
6. Setting up permalinks
The content is successfully imported, and you are one more step closer to having your entire Blogger blog added to your new self-hosted WordPress site. Permalinks are URLs that WordPress uses when organizing posts & pages.
Each post, page, media file, etc. have to have a unique permalink (the address) to work properly. Permalinks might have a huge impact on your site and SEO. And while you can set them up as you wish when starting a new website, we would suggest a different approach when importing a site from Blogger.
Blogger uses month & name to distinguish permalinks. So, if you go to any of your Blogger posts, you will see that it looks something like this: https://demoblog.blogspot. com/2019/05/this-is-post-title.html
In order to keep things in order, we suggest changing the permalink structure in WordPress to resemble that one in Blogger as much as possible:

- Go to Settings -> Permalinks
- Choose “Month and Name” option
- Scroll down and click “Save changes” button
7. Redirect the old content to the new one
Here comes a very important part. If you have been running your Blogger blog for awhile, you must have had some impact on search engines. We also believe that you have been sharing new posts via social media, and have acquired some regular visits to the site. The worst thing that can happen if you move your blog is to neglect the old site and visitors that are still stopping by to the old address.
Blogger is Google’s child, so links to your Blogger blog are important for the SEO (search engine optimization). Even if you stop posting on the platform, the old links will still matter Google and other search engines.
Instead of losing all those visitors that decide to stop by the old blog, you should redirect them to the new self-hosted WordPress site you have just set up.
In order to make this work, you will need to set up the redirections both on your Blogger and WordPress site.
7.1. Redirect from Blogger

- Log in to your Blogger account
- Navigate to Themes
- Scroll all the way down and click on “Revert to classic themes”
Blogger will warn you about losing some of the features by reverting to classic themes. Since you are moving to self-hosted WordPress, you should not worry about this. By reverting, you will enable the option that will allow you to make the redirection possible.
As soon as you confirm that you want to revert to classic themes, Blogger will show you a new settings page. On the page, scroll down to “Edit Theme HTML” section where you get to see the code that powers up your current Blogger themes.
- Select the entire code in the Edit Theme HTML
- Delete the code that you have selected
- Copy and paste the following:
<html> <head> <title><$BlogPageTitle$></title> <script> <MainOrArchivePage> window.location.href="http://example.com/"; </MainOrArchivePage> <Blogger> <ItemPage> window.location.href="http://example.com/?blogger=<$BlogItemPermalinkURL$>" </ItemPage> </Blogger> </script> <MainPage> <link rel="canonical" href="http://example.com/" /> </MainPage> <Blogger> <ItemPage> <link rel="canonical" href="http://example.com/?blogger=<$BlogItemPermalinkURL$>" /> </ItemPage> </Blogger> </head> <body> <MainOrArchivePage> <h1><a href="http://example.com/"><$BlogTitle$></a></h1> </MainOrArchivePage> <Blogger> <ItemPage> <h1><a href="http://example.com/?blogger=<$BlogItemPermalinkURL$>"><$BlogItemTitle$></a></h1> <$BlogItemBody$> </ItemPage> </Blogger> </body> </html> - Go through the code, and replace “http://example.com/” with the URL of your new domain. Check this twice because even the slightest typo will render the redirection useless
- Click “Save theme” button.
If you already know how to install and use WordPress plugins, there is a nice plugin called Blogger to WordPress that will help you with this redirection part. If you install the plugin, it will help you generate the exact same code we showed you above and it will use your URL automatically so you don’t have to worry about messing up:
- Install and activate the plugin
- Go to Tools -> Blogger to WordPress Redirection
- Click on Start Configuration button to generate code for your Blogger blog
- You should see the name of your Blogger blog if you have imported it correctly
- Click on “Get Code” button
- Log in to your Blogger account
- Navigate to Themes
- Scroll all the way down and click on “Revert to classic themes”
- Select the entire code in the Edit Theme HTML and delete it
- Paste the code you have copied from the plugin
7.2. Redirect to your new WordPress blog
- Paste the code you have copied from the plugin
- Log in to your WordPress site
- Navigate to Appearance -> Editor which will open the theme editor
- On the right side menu, find “Theme Function” (functions.php file) which is usually on top of the list
- Click on the file to start editing it. The code will load into the main window
- Copy and paste the following code on the bottom of the file:
function blogger_query_vars_filter($vars) { $vars[] = "blogger"; return $vars; } add_filter('query_vars', 'blogger_query_vars_filter'); function blogger_template_redirect() { global $wp_query; $blogger = $wp_query - > query_vars['blogger']; if (isset($blogger)) { wp_redirect(get_wordpress_url($blogger), 301); exit; } } add_action('template_redirect', 'blogger_template_redirect'); function get_wordpress_url($blogger) { if (preg_match('@^(?:https?://)?([^/]+)(.*)@i', $blogger, $url_parts)) { $query = new WP_Query( array("meta_key" = > "blogger_permalink", "meta_value" = > $url_parts[2] ) ) ; if ($query - > have_posts()) { $query - > the_post() } - Click “Update file” button on the bottom of the page
You do not need to change anything in this code. As soon as you click the “Update file” button, your current theme will get instructed to redirect users from Blogger to the exact post you previously imported into your new WordPress site.
Important note: If you decide to change the WordPress theme, you will have to repeat this step and copy the code to a Theme Functions file of the new theme.
7.3 Redirect Feeds
Unfortunately, we are still not done with the redirection part. We understand your pain; there are not many people in this world who love to go through time-consuming setups, but you will have to find that inner peace and focus for a few more minutes. Don’t forget that you are doing this to improve your blog.
If you have had RSS subscribers, they will not be able to tell that the migration happened. So, in order not to lose their trust, you will have to make another redirection and tell your Blogger blog that you have a new RSS feed.
Luckily, there’s no coding involved:

- Go to your Blogger blog
- Navigate to Settings -> Other
- Find <strong styl
